6

Our shed (in Switzerland) has an outdoor wall that is finished with plaster texture called crépi here which Google translates as roughcast. The plasterer here says it is impossible to replicate today. We have added to the building and would very much like to put the same texture on the new walls.

Does anyone recognize this finish and know how to achieve it and what tool is needed? The plasterer refers to it as style papillon or butterfly style if that helps.

Crépi à l'ancienne enter image description here enter image description here

Zippy
  • 585
  • 1
  • 6
  • 19
  • 1
    It almost looks to me like it was done with a piping bag, then crushed down (possibly after lettting it dry for a while), but I don't know how you'd get the ring around the blob in the middle consistently. You *might* be able to hold the bag against the wall to get an initial blob, then pull it away to leave the blob ... but just from my experience icing cakes, it'll take a long time, and be very, very tiring. ... maybe the separation between the 'ring' and middle parts are an imprint from the nozzle used? – Joe Sep 23 '11 at 13:38
  • Ugh. Looks like more trouble than its worth to me... ;) – The Evil Greebo Sep 23 '11 at 13:40
  • Hmn. Joe's idea is good, but "roughcast" usually implies that there's some amount of aggregate involved. Can you post more pictures to give us a sense of scale? – Karl Katzke Sep 23 '11 at 15:51
  • 1
    Doing some more research, *crépi* usually seems to refer to ANY textured stucco product, and also refers to textured interior paints. I think we'd need to know more specifically what kind of pattern this is. I agree that it's really unique, I'm just clueless as to how to reproduce it. – Karl Katzke Sep 23 '11 at 15:58
  • 1
    plaster work like that is a thing of the past, you'll be hard pressed to find somebody who has the knowledge and skill to do it nowadays. – Tester101 Sep 23 '11 at 16:24
  • 1
    Okay, so I looked back at this, and I think I might've been confused and saw it differently than it was ... this time around, it look more like a sponged texture ... are the edges (both inner & outer) of the ring slightly raised? If so, it might be trowled on, then tamped in a random pattern with something. (what, I have no idea) – Joe Sep 23 '11 at 16:54
  • @Karl Katzke-- will post some more photos so you can see the scale. – Zippy Sep 23 '11 at 17:01
  • @Tester101-- That's what the local plasterer is telling me ...but he doesn't know about StackExchange! – Zippy Sep 23 '11 at 17:04
  • Huh. Could you take another picture identical to the first one with something in it that shows us the scale of that, and possibly one at an angle? I think I have an idea of how to do it, but the first picture looks very different from the second two. – Karl Katzke Sep 23 '11 at 18:18
  • @Karl : I'm guessing that the first one is a rather large section of the wall, and the newer two have to be taken from arm's reach to be able to get the same scale, so can't take as large of an area (without a second person) – Joe Sep 24 '11 at 03:11

3 Answers3

6

I just got an answer by email from the owner of a company in France that specializes in artisanal plaster work. He recognizes it as a very thin lime-plaster that was applied with a bundle of leaves like these:

les balais

with a whipping motion. He calls this type of finish an enduit fouetté which translates as whipped lime-plaster. He suggests that we mix a very thin lime plaster and use a bundle made of olive leaves to achieve this finish.

Here is a pretty good explanation of how these enduits fouettés are prepared and applied (including some videos). I don't see my exact pattern, but some of them come pretty close.

Zippy
  • 585
  • 1
  • 6
  • 19
  • 2
    Wow, I think you got it, Zippy. What I was most confused by was the seeming reversal of the high and low spots in the first picture. – Karl Katzke Sep 25 '11 at 23:23
  • 1
    It's amazing how we look for complex tools to do these things, and it's something completely natural, not manufactured. It's sad that we've lost so much knowledge over the years. – Joe Sep 26 '11 at 01:04
3

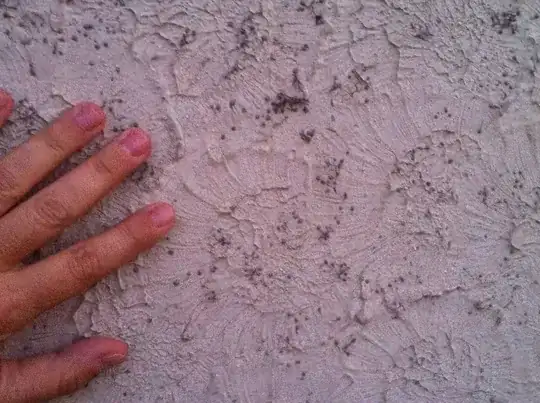
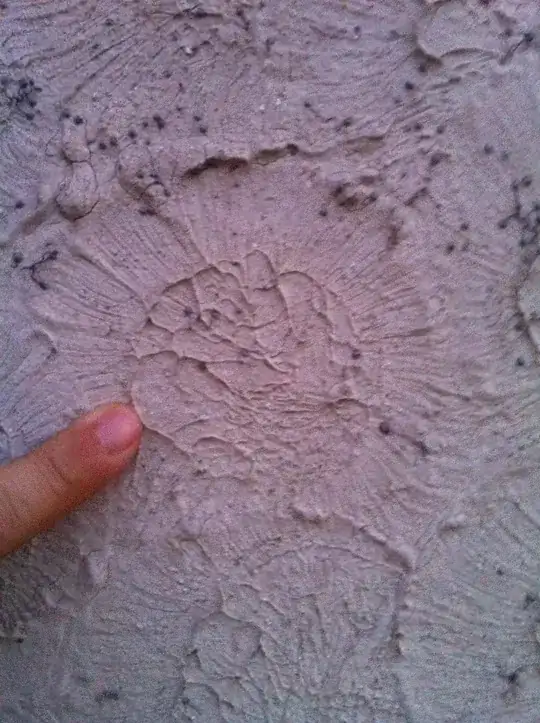
Most stucco/plaster patterns/textures aren't/weren't created by any particular tools but rather by incredibly highly skilled craftsmen. In other words, the pattern was created via decades of experience and skills rather than a particular tool.

We have a stucco house and over the years I've talked to a few contractors and they all said the same thing...good luck finding anyone still alive that knows the particular texture we have on our house.

I eventually had to patch part of it myself. Fortunately, it's on the side of the house few people see. ;)

That said, here's an idea:

You can purchase silicone mold forming material (often used for replicating architectural plaster mouldings and ornamentation). You could purchase some of that and make a cast of maybe a 2'x2' area. Once the mold form is created, patch the area you need to patch with a sloppy-ish mix of stucco. Apply the mold on top of that, let sit, then remove.

It's a long shot, but maybe any option.

Barring all of that, get some plywood, get some stucco, and start practicing. See if you can replicate it.

Bryce
  • 10,586
  • 12
  • 64
  • 107
DA01
  • 24,095
  • 27
  • 73
  • 142
1

I'm almost confused more by the latest image, as in this one, the middle section is so much larger than the size of the ring around it. And my first guess of it being done with a bag are right out, due to the scale.

So, assuming that the dark sections are the highs, and not the lows, I'm going to guess that even if it's not the right thing, you might be able to get a similar texture with something similar to a yarn mop ... but the thing is, you need it to have a series of knots or tangles in the middle, and then the rest of the yarn ... I think you'd almost want it to come out and be tied back, so the ends aren't loose.

You might also have to experiment with types of string, as wool yarn might be too absorbant, and have problems trying to use it repeatedly as a stamp.

Joe
  • 7,246
  • 1
  • 27
  • 45