I agree with Tim that scales should generally be practiced starting and ending on the tonic note for as many octaves as one wishes to play. However in music melodies and improvised solos don’t often have the tonic and octave as the highest and lowest notes. That is where scale positions can be very handy.
Your diagram A is a scale position. There are a total of five for most scales. They then repeat an octave higher. It shows all notes available vertically within reach of your fingers with no or a minimum of shifting.
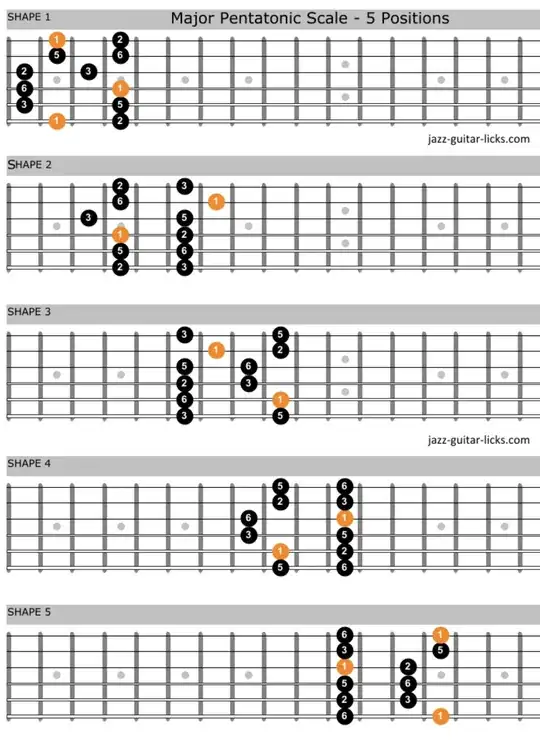
Here is a diagram of the 5 major pentatonic scale positions for G major pentatonic (note the first fret is not visible):

They are stacked vertically for a reason. It shows the notes the positions share in common. You will notice that the right side of position 1 is the same as the left side of position 2, and so on.
If you are going to practice scale positions it is best to work towards learning and memorizing all 5 of them. My approach to practicing scale positions is to start and end on the lowest tonic note. Starting on the low tonic I will play all the way to the highest note then back down past the tonic to the lowest note then back up to the tonic. This sonically gives you the sense of playing in the key of the scale pattern.
Here are two examples of this: For pattern 1 the lowest note happens to be the tonic so I start and end there. For pattern 2 I will start and end on the G on the D string, 5th fret, first ascending then descending then ascending back to my ending note, the G on the D string.
Your practice choices are only limited by your imagination and research. You can play them in smaller segments, use scale patterns such as 132435 or 123234345.
As you get more comfortable you can even start adapting your fingering to transition between one position and another. For example when you get to the G string on position 1 instead of 1-3 you can finger 1-1 and switch to position 2.
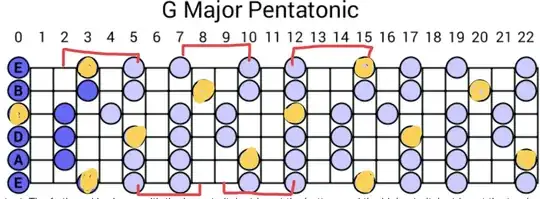
Here is an all inclusive diagram of the same scale like your example B:

Even though I filled in the roots in yellow, this diagram is not quite as helpful as the first diagram, especially since the individual notes are not labeled but it can still be useful. I included red brackets to indicate the scale positions so you can make a comparison between the two.
Some uses for this type of diagram is it clearly allows you to see the intervals of the scale by following it on one string. You can even use this diagram to practice playing scales or scale segments on only one or two strings as well.
